
ProSKU App – The Putaway Process
1. Introduction
The putaway process is used to place goods which have been recorded on a receipt into permanent locations. When a receipt is completed you have the option to:
(a) put the goods away immediately
This option may be used where the person recording the receipt is also responsible for putting goods away to locations, for example where there are limited numbers of staff, or in other situations e.g. where goods are required quickly for picking.
(b) assign the goods to a marshalling area from where they can be collected and put away.
This option is more likely to be used where separate personnel are responsible for putting goods away, either because of greater staff numbers or because of the equipment (FLT etc) required to perform putaway operations. It may, in general, also be considered a more efficient way to manage the receipt and putaway process.
Auto Putaway/Manual Putaway
Automatic putaway is a system function that makes automatic decisions about where received goods are put away. It makes these decisions based on simple rules that you can create to suit your operation. If you use manual putaway this means your staff decide where goods are located based on their knowledge of the warehouse. In either case, completion of putaway is confirmed as part of the putaway process to update the system’s stock records.
2.The Putaway Process (Auto-Putaway)
The Putaway option is contained within the main screen Schedules option, as below.


Select the Putaway option to display scheduled putaway tasks.
This process is slightly different depending on whether you have selected the ‘Putaway’ or ‘Marshalling’ option at the end of the receipt process.
Putaway Process with ‘Putaway’ Option Selected
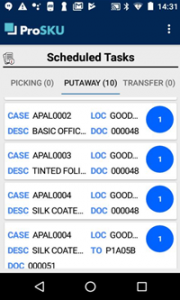
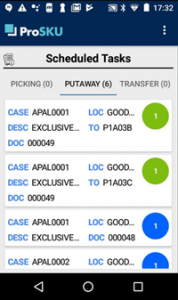 Putaway task schedule showing assigned and non-assigned tasks.
When you receive a single task putaway instruction or select a scheduled task showing a green circle from the putaway task list, the screen will display the following: (see screen example, below)
Confirmation of the receipt reference top of screen
the ‘move from’ location (marshalling area)
the quantity to move and product description
the ‘move to’ (storage) location details.
If the product is palletised it will also show the pallet ID. This is the ID that will be printed on any pallet labels you choose to generate.
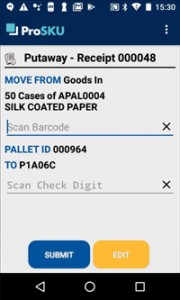
‘Scan barcode’ option: where this function is in use it enables you to confirm the product you want to move by scanning the product barcode, but if used input is mandatory.
‘Scan pallet’ option: where this function is in use it enables you to confirm the correct pallet to move by scanning the pallet label barcode, but if used input is mandatory.
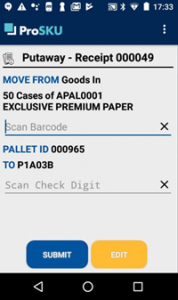

Above screens show pallet putaway with scan (product) and scan (pallet label) options
It will then ask you to confirm the putaway location details. At this point you can use the pre-set system option to confirm the putaway as correct either by scanning the location ‘check digit’ barcode (as seen in examples above) or the location barcode (as example below left). Depending on settings for the device you are using (auto-submit on scan) this will complete the putaway movement.
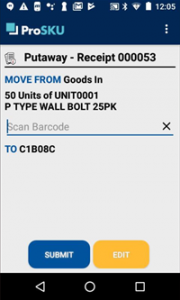
Where neither the check digit or location scan is in use the movement can be completed by using the ‘Submit’ button at the bottom of the screen display, or depending on your settings, by completing a product scan as in the example below right.

Putaway Process with ‘Marshalling’ Option Selected
A task that has been deferred for putaway by selecting the ‘Marshalling’ option at the end of the receipt process will appear on the scheduled task list showing a blue circle as below:
When the task is selected the screen display the following, as per the screen example below left.
Confirmation of the receipt reference top of screen
the ‘move from’ location (marshalling area)
the quantity to move and product description
If the product is palletised it will also show the pallet ID. This is the ID that will be printed on any pallet labels you choose to generate.
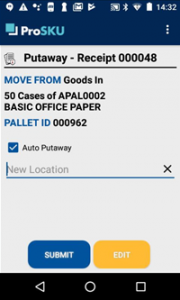
An ‘auto putaway’ check box: this will be checked by default for auto-putaway products.
A ‘new location’ field: this can be used to manually select a location for the goods, if required. It is not necessary to uncheck the ‘auto-putaway’ check box.
- At this point the key difference between the ‘Putaway’ and ‘Marshalling’ options is shown. With the marshalling option a putaway location is not automatically assigned until this point.
In order to assign an automatic location the user selects the ‘Submit’ button and the screen display changes to show the following details, as per the screen below right.
The format of screen is now the same as for a task selected using the ‘Putaway’ option at receipt, as described above, with quantity and product to move and ‘from and ‘to’ locations displayed. The options to scan (product) and scan (pallet label), and to verify putaway either by check digit or location scan are the same.
The Manual Putaway Process
Where manual, rather than automatic putaway is used the format of on-screen instruction is the same except that the ‘Move to’ field shows the words ‘New Location’. At this point the user selected location can be scanned or entered, and on-screen message confirms the putaway. Where a check digit, or product scan is required this will appear on screen after input of the location.
Putaway Process using the ‘Move’ Option
For palletised products a scheduled putaway can also be done using the ‘Move’ option, provided you have generated and attached a pallet label.
At the ‘scan pallet label or location barcode’ prompt in the ‘Move’ option you scan the barcode label of any received pallet that has been ‘scheduled’ as above.
This will identify it as a receipt, and provide the normal putaway instruction as described above. This feature can be useful to expedite putaway movements without pre-selecting an instruction, or when instructed pallets are not the most accessible ones.
3. Putaway Exceptions
In certain instances it may be necessary to deal with variations at putaway. The ‘Edit’ button at the bottom of the putaway instruction screen provides five main options for this as well as a ‘task release’ option (not shown).

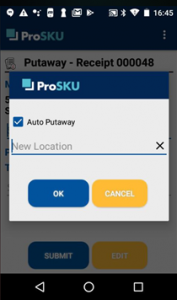
Main options Showing Move function
Move – this is used if the putaway cannot be completed using the system allocated location.
To use this feature select the ‘Edit’ button then select ‘Move’ from the list. If you want to use the auto-putaway feature then simply use ‘OK’ for the system to automatically select an alternative location. The process can then be completed as normal. To select a location manually the ‘auto-putaway’ tick box must first be unchecked. You can then select a location by entering/scanning the location code and complete the process as normal.
Split – this is used when it is necessary to split the putaway quantity of a loose unit-based product, across more than one location. It will not appear on the list if the product is stored on an individual putaway unit e.g. pallet
To use this feature select the ‘Edit’ button and then ‘Split’ from the list. Enter the quantity for the first part of the split, then, after unchecking the auto-putaway box, select a location and follow the normal putaway process. Alternatively select ‘submit’ to generate an automatic putaway location. The balance of the split is then displayed for you to repeat this process and complete putaway.
Recalculate – this is used when the number (quantity on pallet or loose quantity) to be put away is different to that recorded on receipt, and needs to be changed.
To use this feature touch the ‘Edit’ button then select ‘Recalculate’ from the list. Enter the actual putaway quantity in the field provided and add any comments required to the second field, using OK to confirm. The screen will display the message ‘Line recalculated’ and the process can then be completed as normal.
Flag – this is used to highlight any issue which affects the stock itself, or prevents the putaway being completed. This will suspend the task, and remove it from the schedule pending supervisor action.
To use this feature select the ‘Edit’ button then select ‘Flag’ from the list. Using the arrow symbol on the right it is possible to select a reason code, and optionally add notes in the field provided, using ‘OK’ to complete the action.
Reserve – this is used when you want to reserve a specific movement for completion by yourself. For that reason it will not appear as an option on the list if the selected task is already assigned to you.
To use this feature select the ‘Edit’ button then select ‘Reserve’ from the list. The screen will display the message ‘Line Reserved’ to confirm the action. The task is now reserved for the logged-on user who completed the action, and will appear on the schedule with a green circle.
Release – this is used to release a task previously assigned to you at the point of receipt to make it available for another user to pick up and complete. However if the task was assigned to you using features within ProSKU>WMS>App>Schedules option you can only release it using the same option.
To use this feature select the ‘Edit’ button then select ‘Release’ from the list. The task will be automatically released and will reappear on the putaway task list with a blue circle. A message “Task Released” will appear on screen to confirm this has been done.
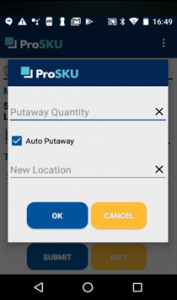
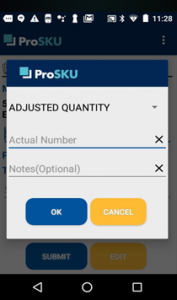
Showing Split function Showing recalculate function