Enter Order Header Information
The Orders option can be accessed from the side menu. Any existing orders will be displayed on screen. If there are no existing orders ‘No Orders Found’ will be displayed.
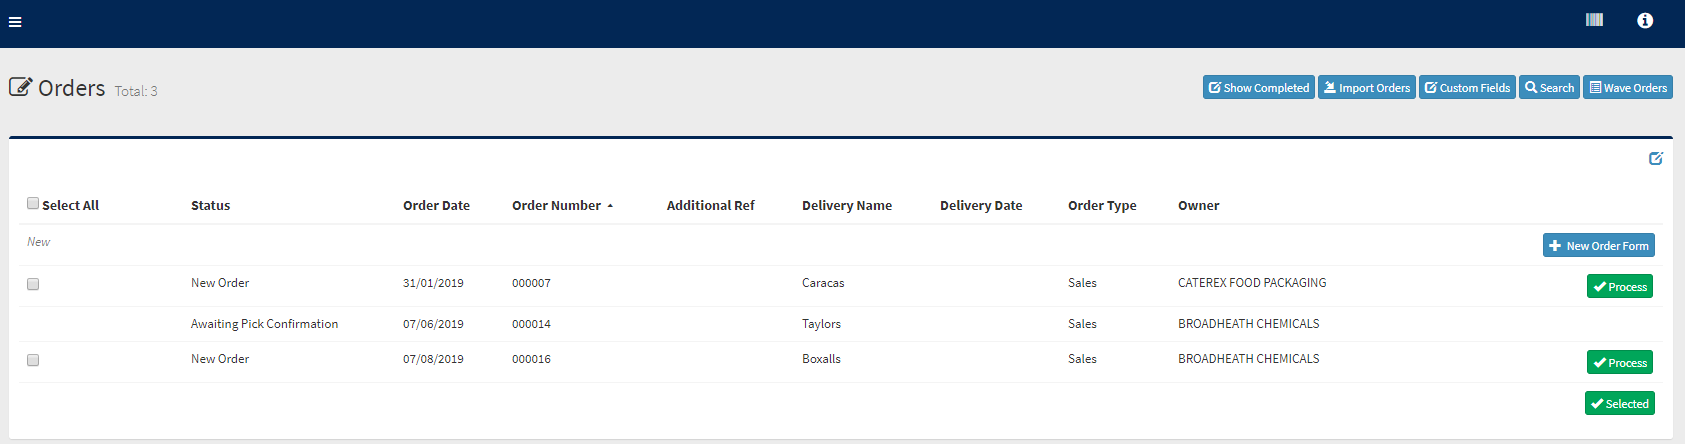
To start a new order click the ‘New Order’ button or on the new line. A form will be displayed which allows you to enter the order header detail.
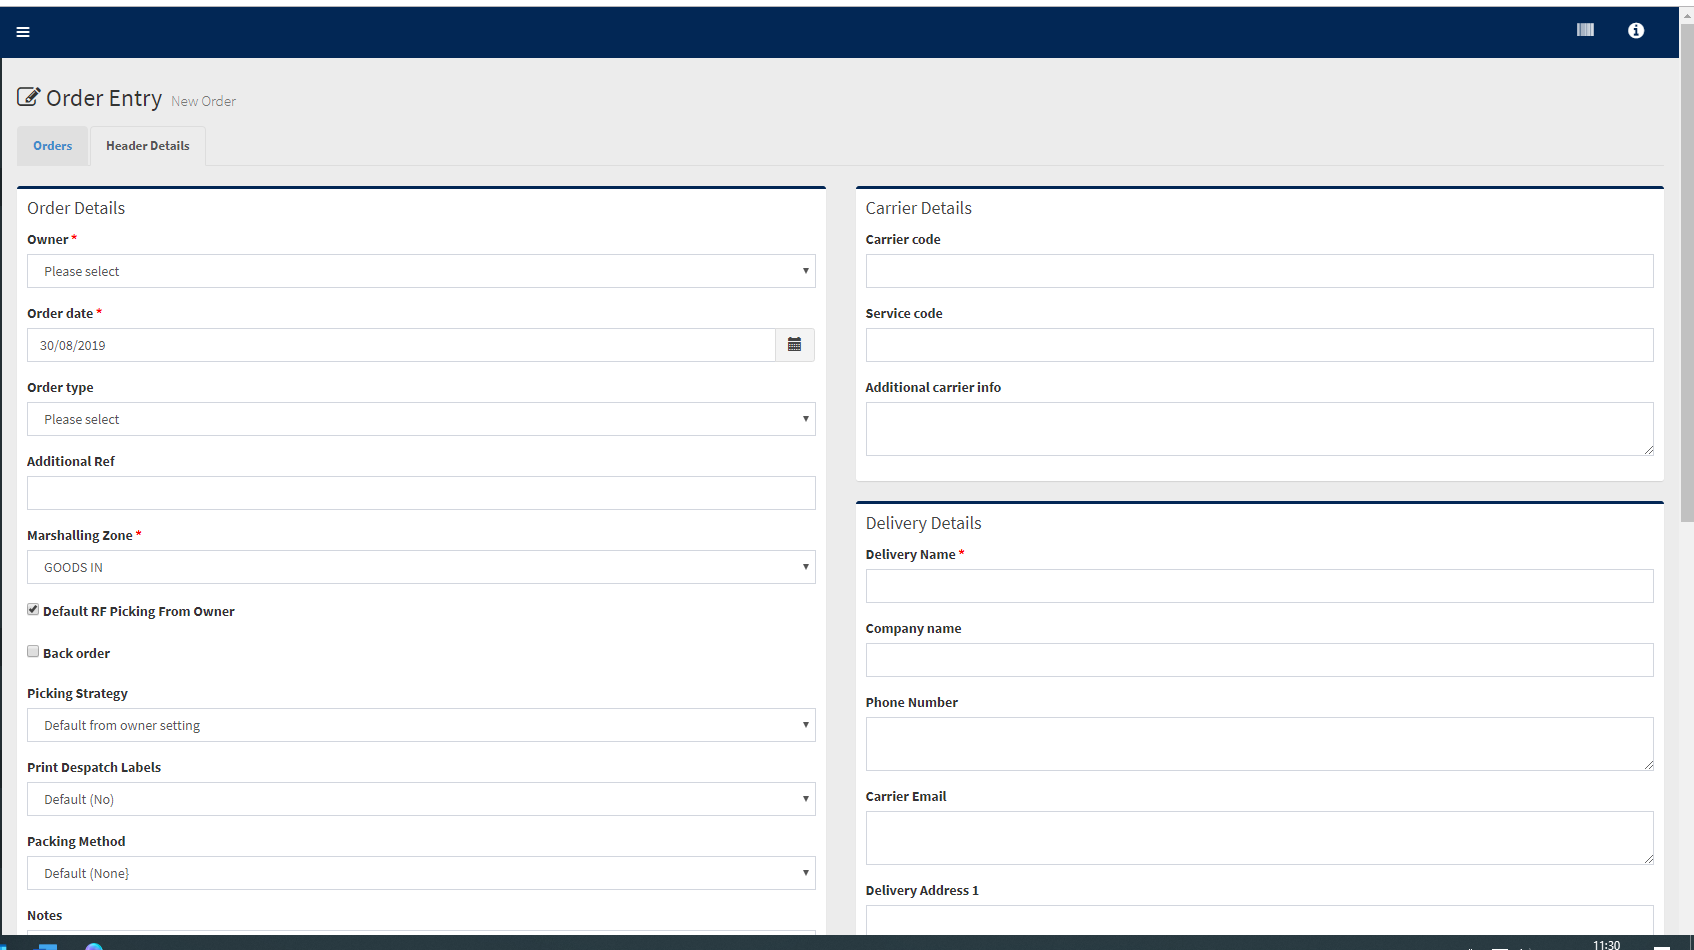
Owner
If your system is set up with the ‘Owner’ function this field is the first field to select. You must enter the owner detail which can be done by selecting from the drop down list on the right.
Order Date
This field will default to the current system date. You can amend the date or click on the calendar button to access the calendar popup. Please note this is the date on which the order is created, not the intended delivery date
Order Type
This allows you to assign a category to the order you are creating which can be used to select data for certain reports. Order types must first be set up in ProSKU>Company Set-up>Order Types.
Additional Reference
This field can be used to add any additional reference relevant to the order. This could be an owner order reference or a delivery point reference. The system will generate its own order reference once you confirm creation of the order.
Marshalling Zone
This is a mandatory field which will default to your selected marshalling zone. Alternative input can be selected from the drop down list.
Default RF Picking from Owner
This check box will only appear if you are using the ProSKU App and indicates that the subsequent picking movement instructions will be sent to the App in accordance with the setting chosen for the owner, where used. Where owners are not in use the default will be in accordance with the setting selected for the depot. If you want to override the setting for a specific order you can do so by un-checking the box.
Back Order
This allows an order to be defined as a ‘back order’ i.e generally one which has been part fulfilled and still requires further stock to be completed. Certain system functions may assign this status automatically to an order. For more information on this please contact ProSKU support.
Picking Strategy
This field will show ‘default from owner setting’ as standard. This refers to the choice you have made in Company Setup>Owners>Picking Strategy. However if you wish to change the setting specifically for this order you can select another option using the drop down list.
Print Despatch Labels
This setting does not currently provide any functionality as standard, except where your ProSKU WMS has been integrated with a carrier management system, in which case the facility to generate despatch labels is available.
Packing Method
This setting does not currently provide any functionality as standard.
Carrier Code
This field is used for input of a carrier code to identify the use of a particular carrier in relation to the order.
Service Code
This field is used for input of a carrier service code to identify the service provided by a selected carrier.
Additional Carrier Info
This field is used for input of additional carrier information e.g. special order or delivery instructions.
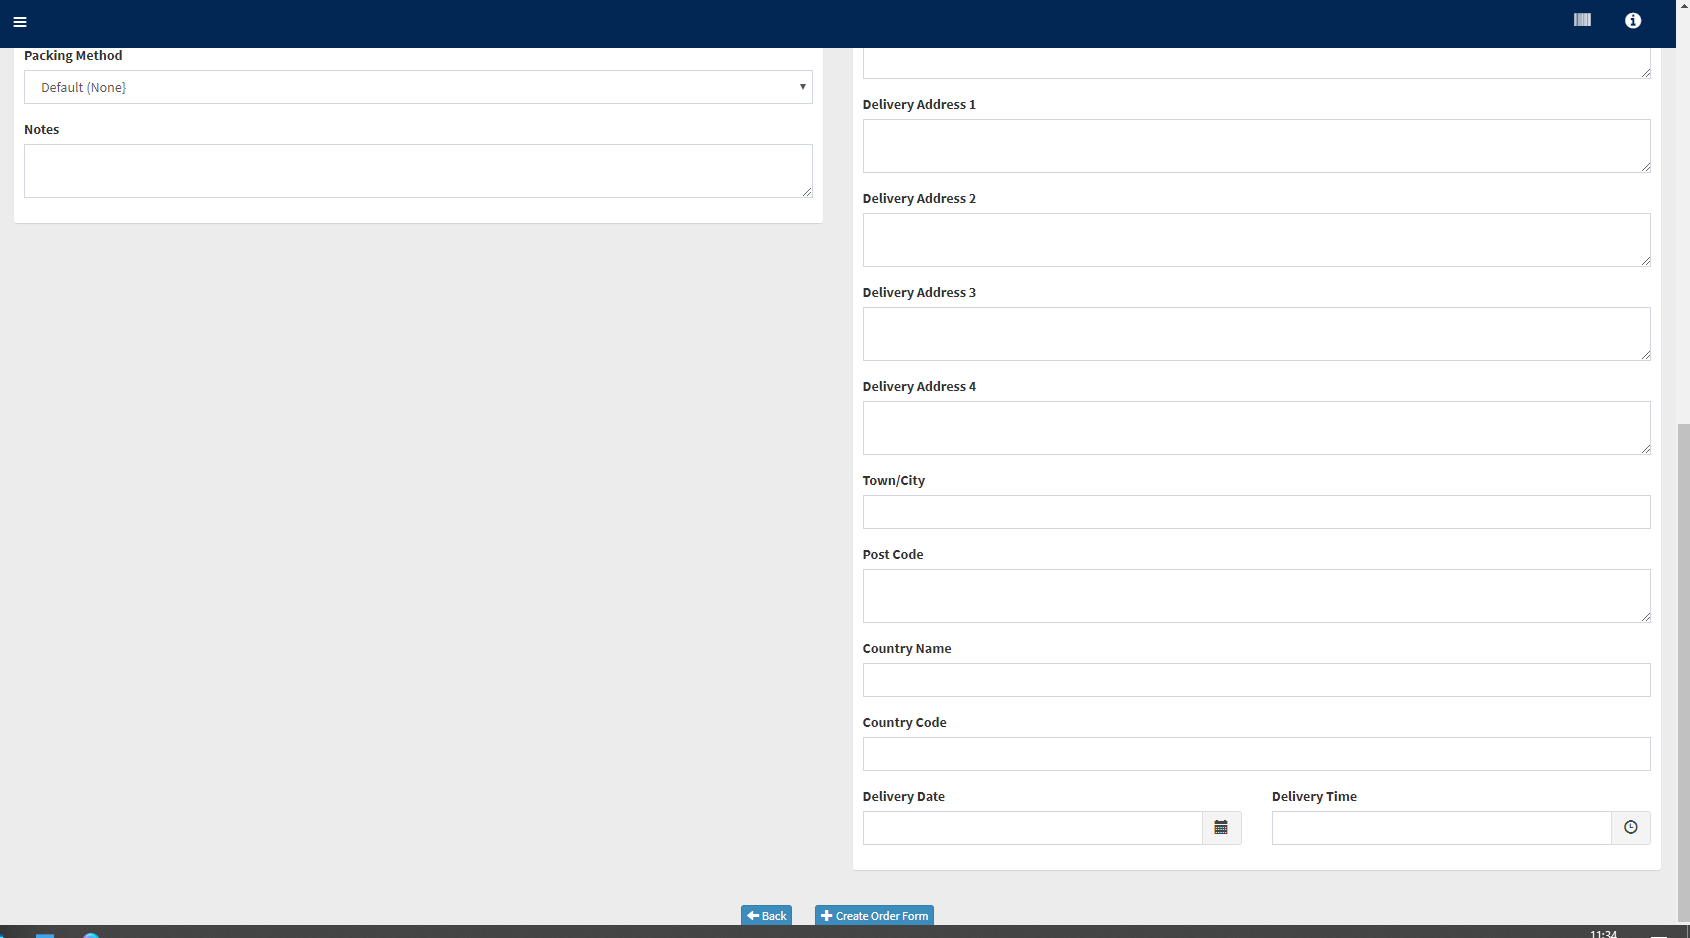
Delivery Details
Delivery Name
This is a mandatory field which can be used for a unique name or, or to identify one already held on the system. If the address is held on the system (Company Set-up>Delivery Addresses) you can type the first 2-3 letters and the system will display the matching delivery address names for you to select from. Once selected the address fields will be completed automatically.
Company Name
The company name will generally refer to the consignee and may be relevant as well as the delivery name depending on the specific order details.
Telephone Number
The telephone number will generally be captured with the order details and will usually be a number for the consignee or other relevant contact.
Carrier Email
The carrier email will generally be captured with the order detail and will usually be an email for the consignee or other relevant contact.
Delivery Address 1-4
These fields contain the address main destination address detail.
Town/City
The destination town or city can also be entered in this field.
Postcode
The destination postcode can also be entered in this field.
Country Name
The destination country can be entered in this field.
Country Code
The country code is a mandatory requirement for order despatch information transferred to external carrier systems.
Delivery Date/Delivery Time
Enter the date and time that delivery of the order is required. There are buttons to open popups to select the date and time from.
Once you have entered your details click the ‘Create Order Form’ button to update and confirm order creation. A message confirms that the order has been created and your header details are displayed as before, with the system generated order number at the top of the screen.
If you wish to edit the order header detail click the ‘Edit Order Form’ button at the bottom of the form.
You will note there is now an extra tab called ‘Order Lines (0)’ at the top of the header detail form.
The order is also displayed as a single line of information on the main ‘Orders’ screen. This can be accessed by clicking the orders tab at the top of the header detail form or by selecting Orders in the side bar. The status of the order is shown as ‘New Order’.
Up to the point of adding order detail information (see below) the order can be deleted by clicking the red ‘Delete’ button to the right of the line. However, once some detail has been entered you must delete this first before trying to delete the whole order.
Enter Order Line Information
Select the order you require (order number is confirmed at top of screen) and click the ‘Order Lines’ tab at the top of the header detail form. The product code search box is now displayed at the top of the screen. (If you have already entered order lines it will appear below these). You can enter one or more characters of either the product code or its description to select a product. All the relevant product matches are displayed for you to select the one you want.

Click on the product you want to add to the order.
When you do this a separate input form is displayed on screen, with the product selected displayed at the top. Below this the first field will be named according to the UOM of the product you have selected. This will be the secondary UOM where one exists, otherwise it will be the storage UOM.

Enter the quantity being ordered into the field.
The following fields will also appear dependent on certain product criteria:
Rotation Date
Enter a rotation date in this field if you want your order to be picked from product with a specific rotation date. It will only appear where the product you have selected is rotated by ‘rotation date’.
Batch Number
Enter a batch number in this field if you want your order to be picked from product with a specific batch number. It will only appear where the product you have selected has a recorded batch number.
Pallet Reference
Enter a pallet reference number in this field if you want your order to be picked from product stored on a pallet (or other full storage UOM) with a specific reference number. It will only appear where the product you have selected is stored on an individual putaway unit.
Stock status
This field will always appear. Enter a stock status if you want your order to be picked from product with a specific stock status.
Once you are happy with the order line information you have entered, clicking the ‘Add’ button will add it to the order. If you wish to cancel the input click the ‘Cancel’ button.

As you add each line to the order it is displayed at the top of the page. To the right of each line there is a ‘Delete’ button to use if you want to delete the line from the order.
Apart from the ‘product code’, ‘description’ and ‘quantity required’ columns, the display contains three additional columns:
- Quantity picked – this will show the picked quantity after picking.
- Ready to pick – this will show the quantity ready to pick after processing the order.
- Despatched – this will show the quantity that has been despatched.
There are also two ‘greyed-out’ check boxes, which reflect the setting of ‘Picking Strategy’ at owner level.
If you have set the picking strategy to either:
- Pick only full order
- Pick only full lines
The ‘All’ check box will be checked.
This means the default position is that you must pick the whole order line. In other words, unless all the stock required to satisfy it is available at the point you click ‘Process’ (see below) the order will not be picked.
If you have set the picking strategy to:
- Pick currently available stock
The ‘Some’ check box will be checked. The default position here is that you can pick any stock of the order line that is available.
NB. Where you have set the picking strategy to ‘Pick only full order’ an extra check box is displayed called ‘Change from pick only full order’. If you uncheck this box you can effectively override the main setting at owner level, so you are no longer forced to pick only the full order.
You also have the option to decide whether to pick the available stock for an order line even if not all stock is available. You can do this by clicking the order line and using the All/Some‘ check boxes. The greyed-out boxes on the order line will reflect any changes made.
You will also see after adding the first order line to your order that three buttons are displayed at the foot of the screen which are:
Check stock
This allows you to check you have enough stock to satisfy the order before processing, or after processing some of the lines on the order.
Process
This will allocate stock to the order as described below
Close this Order
This allows you to close the order before processing or afterwards if you cancel the pick instructions first.
These buttons are also displayed on the main order header page and will perform the same functions.
Processing the Order
Once you have entered all the lines on your order you are then in a position to process the order when ready to do so. This means the stock you require for the order will be allocated to it and you are able to generate a picking instruction.
You can do this by clicking the ‘Process’ button. Before doing this you may wish to check stock availability for your order. You can do this by clicking the ‘Check Stock’ button, and the available stock quantity for the order line(s) will be shown, click on the ‘Back’ button to return to the processing screen.

Before processing you can revisit the order as often as you wish to in order to add, amend or delete order lines. Up to the point of processing you may also close the order at any time.
Once you have clicked the ‘Process’ button the status of the order in the main order display screen will change to ‘Awaiting pick confirmation’. This has generated a movement list which is created within the ‘Movements’ option and all the outstanding movements are displayed on it. A PDF document containing a printable movement list (in this case a ‘Picking List’) can also be generated using that option.
It is now no longer possible to close the order, or amend the main order header information. However, you can still go into the order and cancel the individual pick lines before they are confirmed via Movements (see below). If you cancel the pick for a line you can then delete it, or amend it if required before re-processing to create a new pick instruction.
If you need to close (i.e. cancel) the order after you have processed it, simply cancel the pick against all lines. You are then able to close the order as before. By closing the order you are effectively cancelling it, i.e. because it is no longer required.
Multiple Order Processing
Depending on the volume of orders in your system you may want to process multiple orders at the same time.
To do this, select the ‘Orders’ option from the side menu, or if you’re currently in an existing order click the ‘Orders’ tab at the top left of the screen. The display will show all orders currently in progress and dependent on your selected screen setting, any completed, unarchived orders.
To the left of the screen there are check boxes against each order line displayed, and a ‘select all’ box at the top of the column. You can use these to select one, several, or all of the displayed, unprocessed orders to be processed in one single action.

When you have made a selection using the check boxes, you can then use the ‘selected’ button at the bottom right to confirm the processing for all the orders you have selected.
To the right of the screen there is an individual ‘process’ button against each order line. This button can still be used to process an individual order in the manner described above. It is not necessary to click the check box on the left in order to use this option.
Once you have clicked the ‘selected’ button the status of the orders in the main order display screen will change to ‘Awaiting pick confirmation’. This has generated movement lists which are created within the ‘Movements’ option and all the outstanding movements are displayed on them. A paper copy of the movement lists (in this case ‘Picking Lists’) can also be printed from that option.
It is now no longer possible to close the orders, or amend the main order header information. However, you can still go into the orders and cancel the individual pick lines before they are confirmed via Movements (see below). If you cancel the pick for a line you can then delete it, or amend it if required before re-processing to create a new pick instruction.
If you need to close (i.e. cancel) the order after you have processed it, simply cancel the pick against all lines. You are then able to close the order as before. By closing the order you are effectively cancelling it, i.e. because it is no longer required.
Stock Search at Order Input (Pick-Rule Bypass)
The standard ‘Search’ option within Orders allows you to search by product code for the product you want to add to the order. Once selected, stock for the product is assigned automatically according to the picking rules when the ‘Process’ button is clicked. If stock needs to be picked by a particular rotation date, pallet number, batch or status this can be specified and is taken into account by the picking rules.
This additional function allows you to select based on product code as before, but also by location, batch or status. Individual product stock records are then displayed for you to highlight the stock you wish to add to the order.
When you use this method the product stock you select is assigned to the order immediately (i.e. without needing to click the ‘Process’ button) and will become unavailable for other orders. This is because you are selecting specific product stock, in effect bypassing the picking rules.
This functionality must be activated in the system by the ProSKU technical team.
The order header detail is entered as normal to create the order. However when the ‘Order Lines’ tab is clicked the screen will show the additional ‘Stock Search’ input boxes to the right of the standard Search, as shown in the screen below. You can however still use the standard search function as well, and stock selected this way will be assigned according to the picking rules.
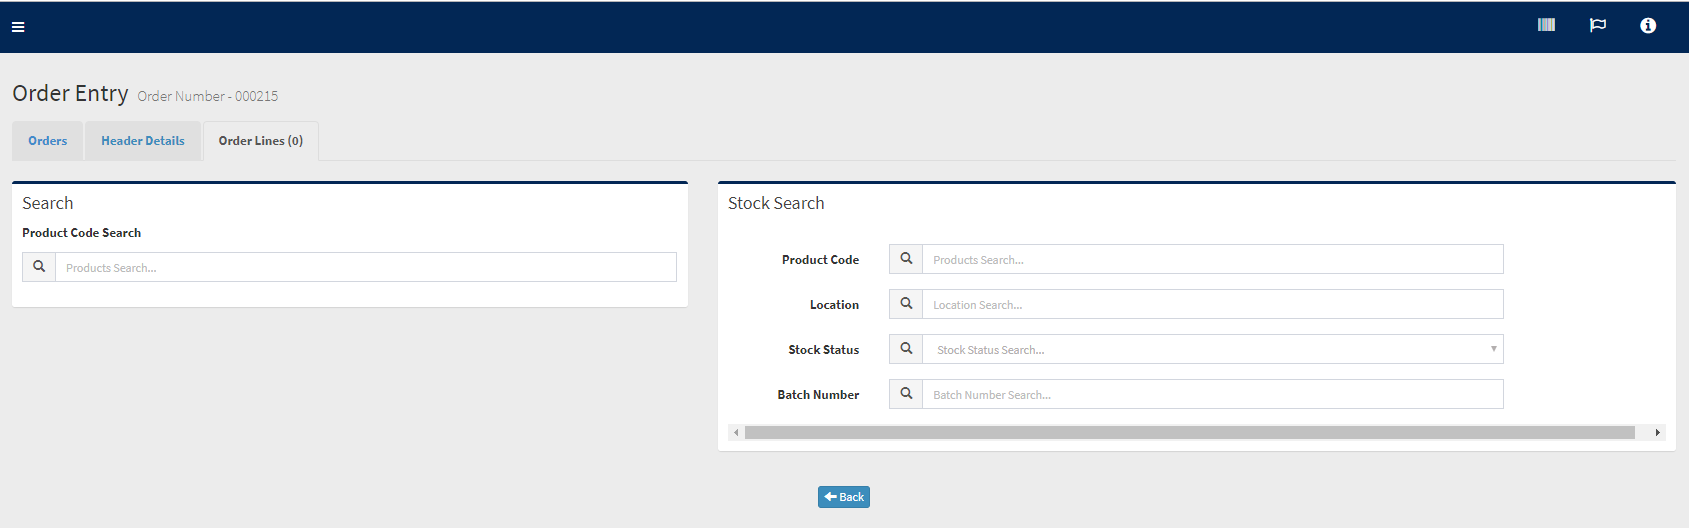
To use the stock search function enter your relevant data into one of the search category boxes: product, location, stock status or batch number. For product, location and batch you must enter specific data. For stock status, you can select from a drop-down list of those available.
A list of items (products etc) matching your entered data is then displayed from which you can select, in order to display the available stock. Once you have made your selection the available stock for the product, location, status or batch is displayed, as seen below.
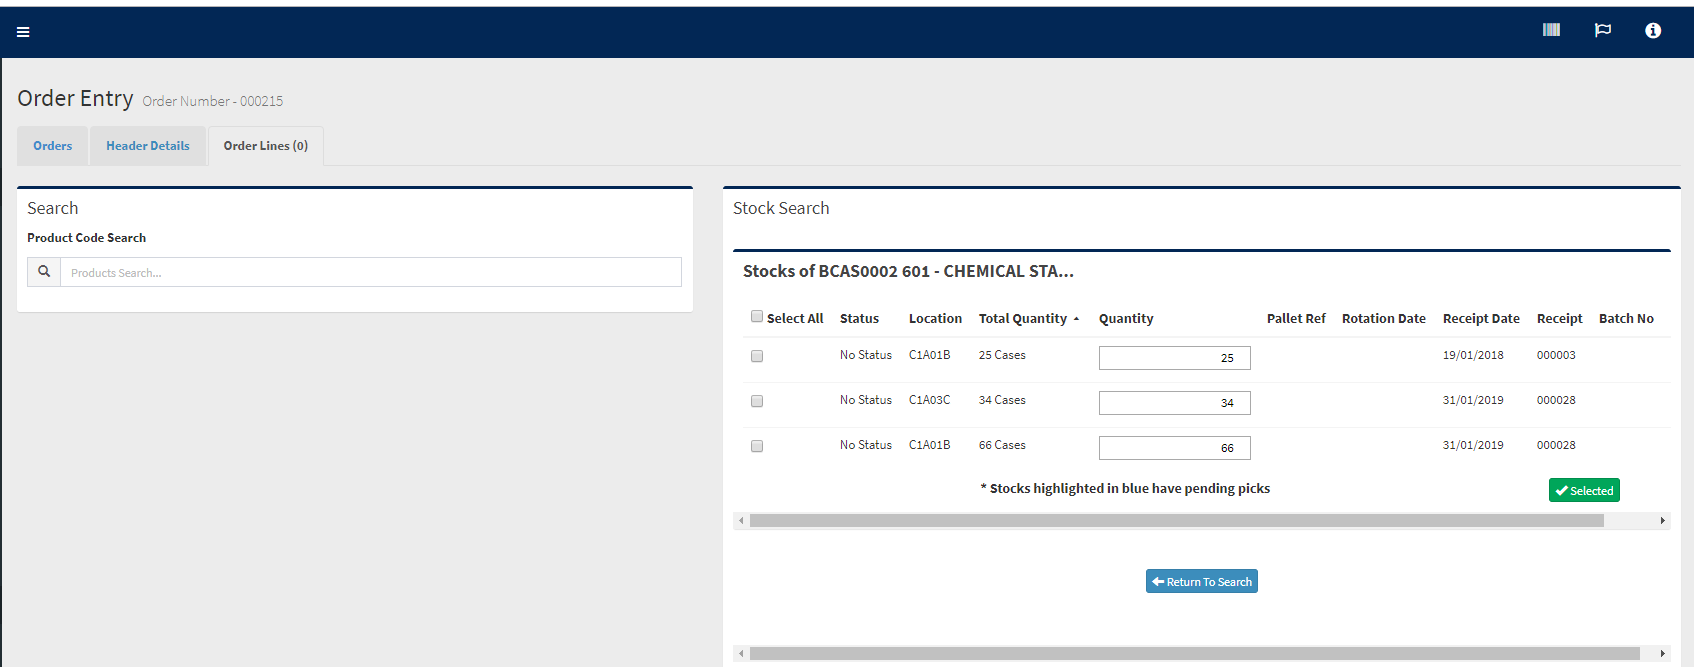
To add the stock to your order click the ‘Add’ button to the right of the line. You can also use the select some/all check boxes and the green ‘Selected’ box to make multiple selections.
If you want to add a part quantity of the stock to the order e.g. to select some of the stock on a pallet or some items within a location you can adjust the quantity required by using the up/down cursors in the quantity field before clicking the ‘Add’ button.
If you don’t want to select any of the displayed stock, simply click the ‘Return to Search’ button.
Once you have selected stock by clicking the Add button, the stock will be added to the order and shown at the top of the screen, as in the following screenshot.
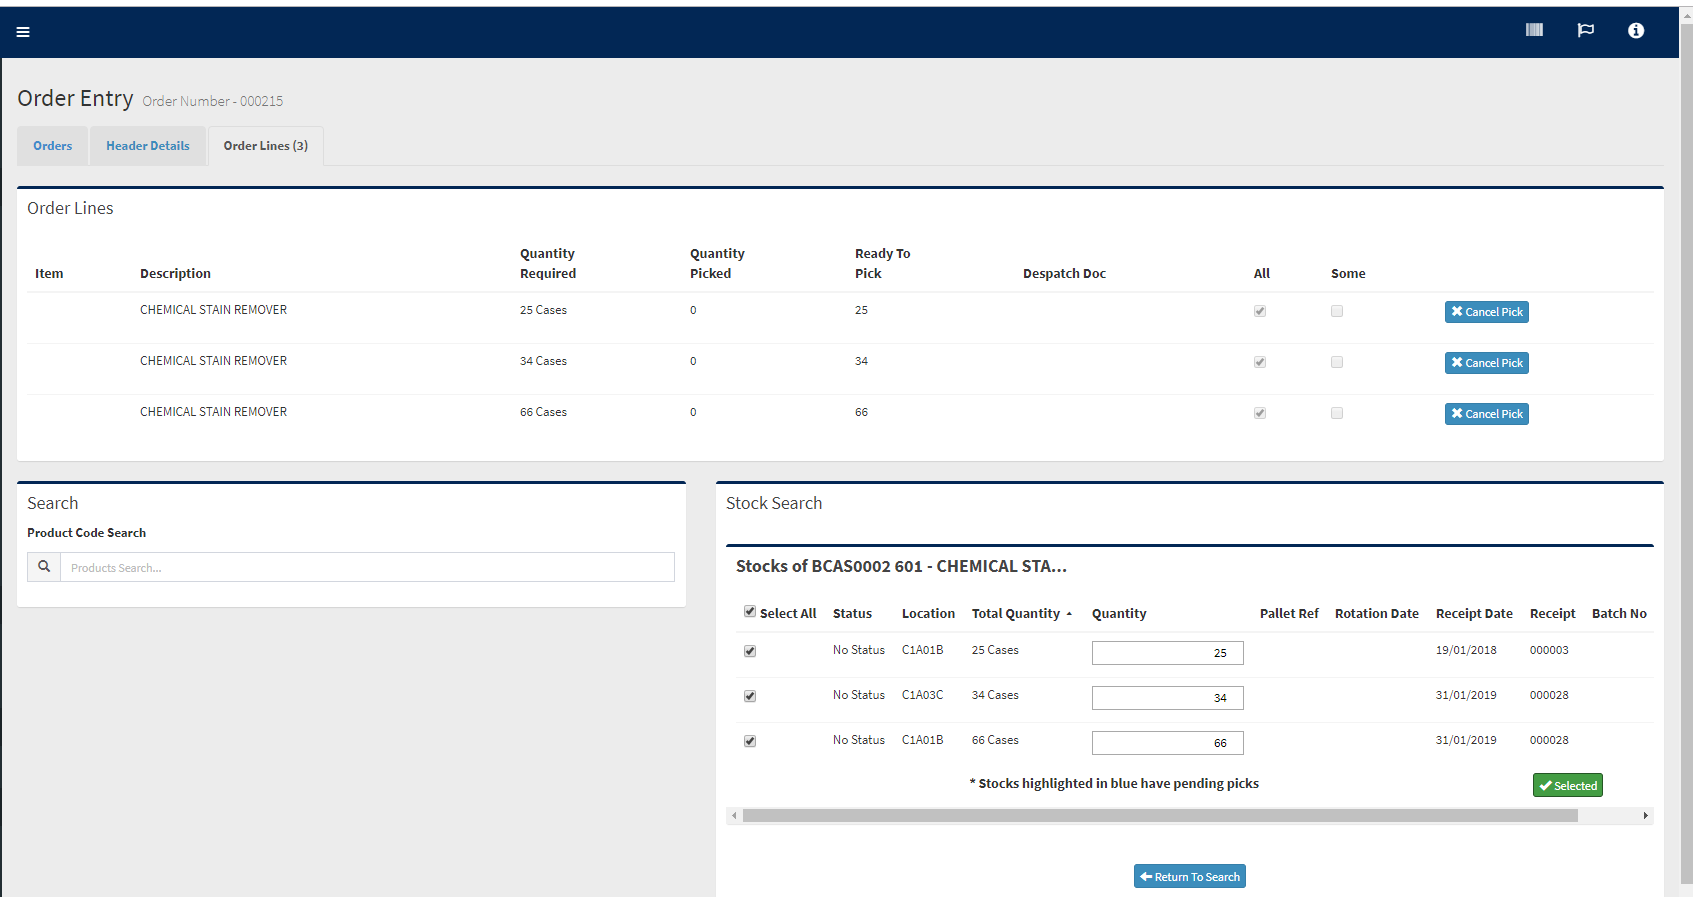
If you perform further searches using the same criteria, stock that has been fully selected i.e. a whole pallet or all items within a location will not appear in the list. If you have made a part selection of stock the stock item will be highlighted in blue.
The ‘Print Label’ button can be used to re-print a pallet label either before stock selection, or after selection to reflect the adjusted quantity.
Once you have completed the order, click the ‘Process’ button to convert it into a movement list. Although the stock selected has already been assigned, this is needed to generate the movement list for picking. It is also required in case you have combined the selection of products with the standard search function to assign product selected by that method using the picking rules.
The movement list for the order can then be processed in the same way as for any other order.
Completing the Order using Movements
The movements option is used to complete any movement generated by the system and to confirm the intended action has taken place. Within the movements option you are able to generate a printed movement list (e.g. a picking list) and afterwards, use this to confirm that all movements have been completed. You can also optionally use a wired or Bluetooth scanner to verify product and or serial numbers as part of this process. This function is controlled by a setting which can be switched on for you by the ProSKU implementation team.
Alternatively you can use a mobile or handheld device to combine the execution (i.e. the picking) and the confirmation in one process. This can also be combined with scanning options in order to verify product bar-codes, serial number bar-codes and picking locations, where required. This is explained below in ‘Picking and Confirmation using Mobile Device’. With both options it is possible to record variations and exceptions.
Mobile View/Classic View Movement List Confirmation
Because of the two options available for movement confirmation you can select two different types of screen view. These are ‘Mobile View’ and ‘Classic View’ and can be changed by clicking the mobile/classic view button as required.
The classic view is more appropriate to a confirmation process using the PC, as all the movements are displayed on screen as they would appear on the movement list. Mobile view presents a different view of the movements to be confirmed which is consistent with use of a mobile device. Rather than list all the movements to be confirmed, the movements are displayed as a single line. Each one is therefore completed as a single operation and when confirmed as completed the next one on the movement list will appear on screen.
To use the movement confirmation option via PC in the classic view format follow the instructions below.

Select the ‘Movements’ option from the side menu. All existing movement lists are displayed on screen and each one is identified by type e.g. putaway, transfer, picking.
You may want to access an individual movement list to view tasks, generate movement list documentation or refer to the original order details. You will also need to access the list to confirm that the movements tasks have been completed.
To access the list click on the movement list line and you will see the following screen display:
At the top there are three tabs:
- Movements – This will take you back to the main movements display;
- Header Details – This will display the movement list header details, where the ‘notes’ and ‘assign to’ fields can be edited;
- Movement Lines – This is the current displayed tab showing the number of movement tasks on the list.
In the middle of the screen under ‘Movements’ the individual tasks within the movement list are displayed. These are the tasks that will be confirmed after completion.
At the bottom of the screen there are three buttons:
- Back – This takes you back to the main movement list display screen
- Confirm – This confirms and updates the movement confirmation – see below.
- Print – This generates the (printed) movement documentation for the selected list
The printed movement list will normally be used by your warehouse staff to perform the movements displayed on screen. During the picking process they can confirm completion of the movements and report any variations. This information is then used to perform the movement confirmation on screen.
If you want to generate individual movement list documentation as above click the ‘print’ button. If you want to generate documentation for multiple movements lists, follow the process below:
Generating Documentation for Multiple Movements
To the left of the main movements display screen there are check boxes against each movement line and a ‘select all’ box at the top of the column. You can use these to select one, many or all of the displayed movements in order to generate a batch of documentation for those movements.
To do this, check the boxes for the movement lists you require, then click the ‘print selected’ button at the bottom right. The system will now generate a PDF containing the printable movement lists.
Confirming Movements
You can access a movement for confirmation purposes by clicking on the movement line as described above or by using either the Movement List scanning options or the ‘Quick Find’ scan facility (see below).
Check box – ‘All Movements Done (does not appear if only single stock item picked)
Check this box if all movements have been carried out as per the details on screen. If the product is set to record serial numbers on picking (product setup) you will now be prompted to enter them, all you need to do to after this is click the ‘Confirm’ button.
Check box – Individual Movements
As an alternative you can check the box against an individual line. You normally use this where some but not all of the movements have been completed. If you use the ‘Confirm’ button after this any unconfirmed movements will remain on the movement list.
Edit button – Individual Movements
The edit button allows you to deal with variations that may occur with picking (short, non-pick, etc.) It has two options: ‘Cancel’ and ‘Recalculate’. In certain situations (see below) only the ‘Cancel’ will be available.
Cancel
This option allows you to cancel the pick instruction altogether but you will be asked to confirm that you are sure before doing so. The order line will be retained on the original order. You can then delete, or amend and re-process it as needed.
Re-calculate
This option allows you to amend the number of cases or items that were actually picked when the full order quantity has not been picked.
- Amended Quantity
Enter the actual number of items that were picked in this field. You must then enter a note for audit purposes into the ‘Notes’ field. (If you press ‘Accept’ before doing this the field will be highlighted before you can proceed). After doing this click the ‘Accept’ button and the system will amend the movement to the new quantity.
The amended quantity will also be updated on the order line detail display under the heading ‘Picked’.
You can now confirm the movement as complete in the normal way by checking the box and clicking the ‘Confirm’ button.
Cancel (as only option)
If the movement you are confirming is one for which a replenishment has been generated (and which can not be completed without the replenishment) the ‘Recalculate’ option will not be available.
Recording Serial Number Products
If the product you are confirming is one that requires the recording of serial numbers at picking then an input box to enter these will appear below the check boxes. You are required to enter a serial number for each of the items/storage UOM that you are confirming.
If you do not enter the required quantity of serial numbers you will not be allowed to confirm the movement list.
Once all the pick movements have been confirmed (including accepting any adjustments made) the picking stage is now complete. However, the way in which you complete the full order process will now depend on whether the order is fully picked, or only part picked.
Picking and Confirmation using Mobile Device
This option is available using any web-enabled device with an appropriate browser. However the option to use scan verification is a control setting which can be switched on for you by the ProSKU implementation team. The two settings which can be selected are:
- Scan at Pick OFF/ON
- Check digits OFF/ON
Which of these settings (either, or both) you select will depend on your operational preference and the level of integrity you wish to build into the picking process. It will depend on whether you have products with bar-codes, products with serial numbers and if you use check digits in conjunction with your location codes. The operation of the functions is explained in the diagram below:
| Product Criteria | Pick Scan ON | Pick Scan + Check Digits ON | Check Digits only ON |
| Has product bar-code
|
One scan of product ba-rcode
|
One scan of product bar-code
|
One scan of check digit
|
| Has product bar-code + serial number
|
Two scans – product bar-code + serial number
|
Two scans – product bar-code + serial number
|
One scan of check digit
|
| Has serial number but no product bar-code
|
One scan of serial number
|
Two scans – check digit + serial number
|
One scan of check digit
|
| Has nothing
|
No scan – just confirm
|
One scan of check digit
|
One scan of check digit
|
Taking each line of the diagram above:
- Where a product has a bar-code label it makes sense to use this as the verifier. So where check digits are also switched on there should be no need to scan this as well as the product.
- Similarly, if both product bar-code and serial number bar-codes are present it should be unnecessary to force a check digit scan. The right product has been picked if the two previous scans are OK.
- Where the product requires a serial number scan you may still require to verify the product (or location it’s picked from) which can be done by having check digits switched on.
- With no product or serial number bar-code present the only available verification can be a scan of the location check digit. This can be optionally switched on if required.
Movement List Scanning Options
Each printed movement list will have a bar-code at the top containing the movement list number. If there is an additional reference on the movement record a bar-code will also appear for this too. Where both appear they are identified by a description immediately beneath the bar-code. These bar-codes offer a number ‘short cuts’ you can use to access some of the options simply by scanning. To use this facility, check the ‘search bar-code’ box ((represented by small bar-code symbol) at the top right of the screen. You do not have be in the movements option.
- If the movement list bar-code is scanned after the list has been printed it will take you directly to the movement confirmation screen.
This would typically be used where you have completed or partially completed the pick process and want to access the confirmation screen as quickly as possible. As long as there are unconfirmed movements on the list, scanning the bar-code will return you to the movement confirm screen.
- If the movement list bar-code is scanned after the movements have been fully confirmed it will take you directly into the despatch option.
This would be used once the movements have been fully confirmed and you want to access the next (despatch) stage as quickly as possible. However:
- If there here is more than one movement list associated with the order, and the one being scanned has been confirmed, this will also take you directly to despatch
This is because although there are unconfirmed parts of the same order, as these are on a separate movement list they will be confirmed separately and create a separate despatch.
- If the movement list bar-code list is scanned after a movement list has been (fully) cancelled it will not be recognised by the system.
- If the movement list bar-code is scanned after the despatch has been completed this will take you to the despatch record held against the order.
All Purpose Barcode Scan
The ‘Search bar-code’ option mentioned above can also be used for general purpose scanning and will take you to the ‘data source’ for any bar-code scanned. For example if a product bar-code is scanned at this point it will take you to the product record.

Completing the Order Using Despatch – Fully Picked Orders
The Despatch process is the final stage in the order cycle. At this point you can print a clean delivery note for the order and confirm it has been despatched. You are also able to amend delivery information for the order i.e. delivery address, date and time of delivery.
After confirming an order as fully picked, the following will take place:
- The details will be transferred to Despatch
- The order status will change to ‘Completed Pending Despatch’
- The order line ‘Despatched’ column will show the delivery note references it has generated.
Scanning Movement List ‘Additional Reference’ for Quick Despatch
If the movement list you have used to confirm picking has a bar-code for an additional reference this can be used to process a confirmed order through despatch. Within the despatch option there is an ‘Order ref to despatch’ box in the top right of the screen. After checking this box the additional reference bar-code can be scanned, which will automatically confirm the movement list as despatched (not available for scan at pack orders). If you do not wish to use this facility follow the process below:
The Despatch option can be accessed from the side menu. Any existing despatches are displayed on screen. If there are no existing despatches ‘No Orders to Despatch Found’ will be displayed.

The way the despatch option is used will depend on the kind of order being despatched – either a standard despatch, or a ‘scan and pack’ despatch. Scan and pack despatches allow you to combine the despatch process with a packing function and use a scanner to confirm that the correct products are included on the order.
Standard Orders
The order despatch detail is displayed as a single line with a status of ‘Awaiting’. If you click the line you can amend the delivery date and time, and the address details. You can also view the order details by clicking the ‘view order detail’ button. After making any amendments click ‘Save’ to accept the changes.
To the right of each line there are two buttons – ‘confirm’ and ‘print delivery note’.
The ‘confirm’ button is used if you want to confirm an individual order as despatched. This can be done after generating delivery documentation (see below) or at any time if documentation is not required. You can also use the multiple confirmation option described below.
The ‘print delivery note’ button is used to generate delivery documentation for the order. If you need to amend delivery detail after doing this you can reprint the note with the new details provided you have not confirmed the despatch. You can also use the multiple print option described below.
Once you have amended the despatch details and generated documentation as required clicking the ‘Confirm’ button will confirm completion of despatch. It will delete the order from the despatch display, but the order detail is retained on the system for the period specified in ‘Company Setup>Owners>>Select Owner Record>Order retain days. All related movement records can be accessed through the Stock Movement History report.
*Tip You can choose whether or not to show completed orders in the main order display by clicking the ‘Show/Hide Completed’ button at the top of the order screen.
Multiple Confirmation & Print Option
These facilities allow you to confirm multiple despatches, and print multiple delivery notes in single actions. The ‘select all’ and individual check boxes on the left hand side can be used to select the orders you want to confirm, or those for which you require delivery notes. After making your selection click the ‘confirm selected’ or ‘print selected delivery notes’ button. The selected despatch lines will then be confirmed as complete, or the selected notes printed as described above.
NB You will not be able to use this function to select scan and pack orders for confirmation before the scan operation has been carried out.
Scan and Pack Orders
The scan and pack order function allow you to combine the despatch process with a packing function and use a scanner to confirm that the correct products are included on the order. It can be applied to individual products as needed, and both full scan orders and mixed orders (scan and non-scan products) can be handled.
As with standard orders, the despatch detail is displayed as a single line, but in this case it will show a status of ‘scan’. The same options are available for amendment as is the facility to view the order details. However, with a scan and pack order the buttons to the right of the line differ to those for standard orders, as follows:
‘Scan’
This button allows you to enter and commence the scan operation. The despatch cannot be confirmed until this operation has been completed.
‘Show note’
This button allows you to view the despatch documentation, but as a precaution the paperwork is watermarked to indicate that a scan is required, and it should not be printed
Scan Operation – Full Scan Order
As mentioned earlier the scan operation can be used for orders containing scan products only (full scan orders) or for mixed orders which contain both scan and non-scan products.
Depending on the way your system is set up, you may either be required to scan each item on the order, (item scanning) or to scan a single product and enter the quantity being packed (product scanning). However the process is intuitive, with only small differences between the two options.
Click the ‘scan’ button to commence the scan operation.
You are instructed simply to ‘scan next item’ so that initially any product or item from the order can be scanned. Once an item has been scanned the following processes apply:
For product scanning:
The product code and description of the scanned product is displayed and you are required to enter the quantity being packed. After entering the quantity click the ‘submit’ button. The system will then ask you to scan the next product, and repeat the process. Once all products on the order have been scanned, click ‘complete’.
For item scanning
The product code and description of the scanned item is displayed, and you can continue scanning items. If you continue to scan items of the same product this will display a running total of items scanned for that product. If you alternate scanning of products the single item scanned will be displayed and confirmed. Once all items on the order have been scanned, click ‘complete’.
Please note the following:
- If you scan an incorrect barcode a message will alert you to this effect. You are then given the option to continue the scan or cancel the scan if parts of the order have already been correctly scanned.
- If you enter an incorrect quantity a message will alert you to this effect. You are then given the option to continue the scan or cancel the scan if parts of the order have already been correctly scanned.
- If you click the ‘complete’ button before you have scanned all the items, a message will alert to this effect. You are then given the option to cancel the scan or continue the scan if parts of the order have already been correctly scanned.
After clicking ‘complete’ you will see that the despatch line display now has a status of ‘awaiting’ to confirm that the scan operation is complete. The buttons to the right of the line also now show the usual options – to print delivery documentation and confirm the despatch.
You are also now able to use the multiple confirmation option described above for any completed scan and pack orders.
Scan Operation – Mixed Order
As with standard orders, the despatch detail is displayed as a single line, but in the case of a mixed order it will show a status of ‘part scan’. The same options are available for amendment as is the facility to view the order details. The buttons to the right of the line are the same as for a full scan order, i.e. ‘scan’ and ‘show note’.

Click the ‘scan’ button to commence the scan operation.
As you are now dealing with a mixed order the system needs to instruct which product items are scanned and which are not, so you are presented with a product code and description for the first of the scan products.
Begin scanning the products or items as described above and depending on set-up, enter the quantity to confirm the items being packed.
When you have completed all the scan items on the order the non-scan items are automatically displayed, along with the quantity to be confirmed.
Confirm these items by clicking the ‘Confirm Quantity’ button on the right, and when all are confirmed click the ‘complete’ button.
As before, if you scan an incorrect barcode or enter an incorrect quantity a message will alert you to this effect, and you will be given the option to continue the scan or cancel as the case may be.
Likewise if you click the complete button before you have scanned or confirmed all the items a message will alert you, and you will be given the option to continue or cancel as the case may be.
After clicking ‘complete’ you will see that the despatch line display now has a status of ‘awaiting’ to confirm that the scan operation is complete. The buttons to the right of the line also now show the usual options – to print delivery documentation and confirm the despatch.
You are also now able to use the multiple confirmation option described above for any completed scan and pack orders.
Completing the Order Using Despatch – Part Picked Orders
Part-picked means that one or more lines on the order have not been fully picked and so the process of order completion is different in this situation. This allows you to exercise options in the way you complete the order.
A part picked order does not go straight to Despatch in the way that a fully picked one does. Instead, it will be retained in Orders with a status of ‘part picked’. When you return to the order you will have the following options:
Check Stock/ Process/ Despatch/ Despatch and Close
Check Stock
This lets you check on stock availability before processing any unpicked lines
Process
This lets you process a pick for any remaining unpicked lines/quantities
Despatch
This will send the picked items to despatch and retain the unpicked ones.
Despatch and Close
This will send the picked items to Despatch and close the order (see below).
Despatch
If you click ‘Despatch’ you are effectively choosing to despatch the completed part(s) of the order. This could mean literally completed i.e. exactly what the customer ordered for some order lines, or in the case of part or unpicked lines, whatever you consider to be completed at that point. The key point is that the order will remain open and the short or unpicked lines will be retained for later processing.
After you click ‘Despatch’ the order line display will be changed to reflect the short picked quantity, and a new line will be created to reflect the un-picked balance of the original order quantity. If subsequent part picks are made without the order line being fully picked this process will be repeated.
To despatch the picked stock, follow the Despatch process as described above. The delivery note will indicate any shortfall in the order quantity in the ‘Unpicked’ column.
To process the remainder of stock, return to the order and use ‘Check Stock/Process’. If you decide you no longer want to retain the order simply click ‘Close this Order’. Its status will then be changed to ‘Completed’.
Despatch and Close
If you click ‘Despatch and Close’ you are choosing, as in the situation above, to despatch the completed part(s) of the order. The difference here is that the unpicked lines will not be retained. The order will be closed and its status changed to ‘Completed’.
To despatch the picked stock, follow the Despatch process as described above.
Despatch Labels
Introduction
ProSKU provides the functionality to generate a despatch label for any picked consignment. This is a standard feature of the ProSKU system, but is different to carrier-specific label generation, which is usually handled via integration to a carrier management system.
The standard despatch label option is more likely to be used if you despatch consignments via your own, or sub-contractor vehicles when you are not using a standardised carrier label.
To use the despatch label feature it must be activated in the general parameters by the ProSKU implementation team. This will enable the generation of the PDF labels, and as a separate setting determine whether or not the generated labels will show the consignment contents.
Showing the contents on the label is an optional setting. It is likely to be required when consignments are consolidated after picking, for example on a pallet, and identified by a single label, as described later.
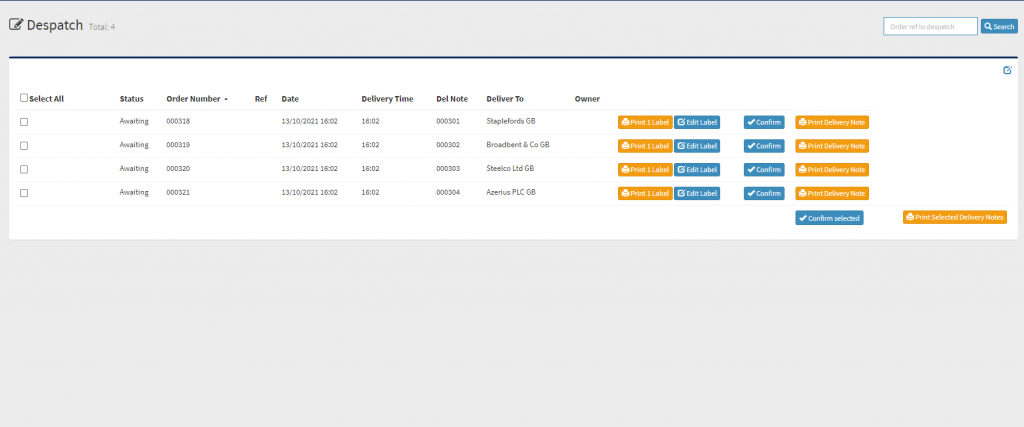
The Despatch Screen
The despatch screen displays all consignments which have been successfully picked and are ready for despatch. It gives options to ‘Print’ (a delivery note) and to ‘Confirm’ (despatches as complete). When an order is a Scan to pack order, it will also show a ‘Scan’ instruction, which needs to be completed before a delivery note can be generated.
When the despatch label feature is activated further options are available. The screen will now show ‘Print Labels’ (with the label quantity to be generated) and the facility to ‘Edit Labels’ as per the screenshot below.
Using the Despatch Label Feature
There are two modes of operation for the despatch label feature. Which one you use will depend on whether or not you intend to consolidate consignments and use consolidated labels.
Basic Operation
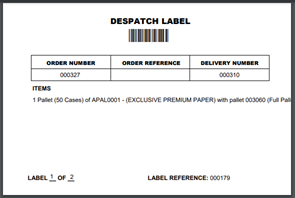
If you do not need to consolidate consignments/labels the system provides labels in a standard format. This can be optionally tailored at implementation (for layout, adding logo etc.) The label below shows the following information: order number; additional reference; delivery/despatch number; unique label ID; number of consignments (part 1 of 2/3 etc.) It does not show details of the products that have been picked.
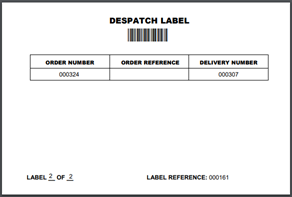 Standard despatch label
Operation using the standard label format is appropriate in various scenarios whether picking full or part pallets, or loose consignments. The number of labels produced will equate to the number of pallets or cases picked e.g. 2 pallets = 2 labels, but a part pallet or quantity of loose cases picked within the same order will also generate a label. If more (or fewer) labels are required, for example if a consignment has either been split or combined, the ‘Edit Labels’ feature can be used to amend this. The order details shown remain the same, but the label count (part 1 of 2/3 etc.) will change.
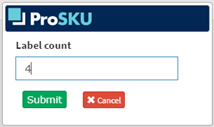 The edit label feature allows you to vary the number of labels being generated
Operation for Consolidation of Consignments/Labels
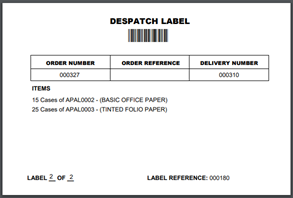
If this functionality is required it can be activated in the parameters by the ProSKU implementation team. This will mean that the generated labels show not only the details as per the example above, but also the products included within the order. So that when consignments are merged, the label information including the product details can also be combined.
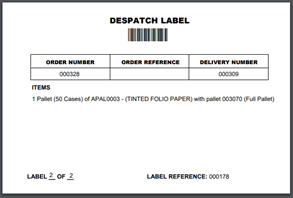 Label showing content
In order to handle the merging of consignments, the ‘Edit Labels’ feature works in a different way to that of the standard operation. When the Edit feature is selected, the screen as shown below will display the consignments which make up the order. The consignments you want to merge can be selected using the check boxes, which can then be confirmed by selecting the ‘Merge selected ‘ button, as per second screen below.
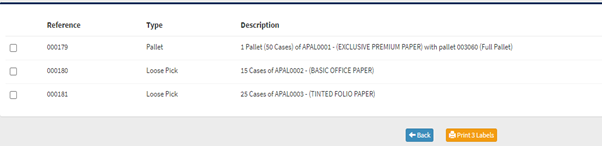
Edit labels showing consignments to merge
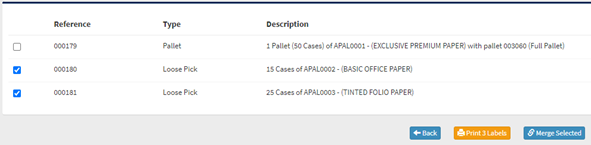
Confirming merge of selected consignments
Once you have confirmed the merged consignments it is then possible to print the labels, including those which reflect the merged consignments, as below.